본 게시물은 andrew ng 교수님 deeplearning specialization 강좌의 강의노트입니다.
1. Keras convention
텐서플로에서 z1=..., a1=... 로 변수와 layer를 모두 따로 저장한 반면에,
keras에서는 x_input을 제외하고 x로 계속 덮어씌운다.
1) 모델 정의
def HappyModel(input_shape):
    """
    Implementation of the HappyModel.

    Arguments:
    input_shape -- shape of the images of the dataset
        (height, width, channels) as a tuple.
        Note that this does not include the 'batch' as a dimension.
        If you have a batch like 'X_train',
        then you can provide the input_shape using
        X_train.shape[1:]


    Returns:
    model -- a Model() instance in Keras
    """

    ### START CODE HERE ###
    # Feel free to use the suggested outline in the text above to get started, and run through the whole
    # exercise (including the later portions of this notebook) once. The come back also try out other
    # network architectures as well.
    X_input = Input(input_shape)

    # Zero-Padding: pads the border of X_input with zeroes
    X = ZeroPadding2D((3, 3))(X_input)

    # CONV -> BN -> RELU Block applied to X
    X = Conv2D(32, (7, 7), strides = (1, 1), name = 'conv0')(X)
    X = BatchNormalization(axis = 3, name = 'bn0')(X)
    X = Activation('relu')(X)

    # MAXPOOL
    X = MaxPooling2D((2, 2), name='max_pool')(X)

    # FLATTEN X (means convert it to a vector) + FULLYCONNECTED
    X = Flatten()(X)
    X = Dense(1, activation='sigmoid', name='fc')(X)

    # Create model. This creates your Keras model instance, you'll use this instance to train/test the model.
    model = Model(inputs = X_input, outputs = X, name='HappyModel')

    return model
2) 적용
happyModel = HappyModel(X_train.shape[1:])

# optimizer, loss 함수 선택하고 fit을 통해 train set에 적용
happyModel.compile(optimizer = 'adam', loss = 'binary_crossentropy', metrics = ['accuracy'])
happyModel.fit(X_train, Y_train, batch_size = 32, epochs = 30)

# Test set
preds = happyModel.evaluate(X_test, Y_test)
print()
print ("Loss = " + str(preds[0]))
print ("Test Accuracy = " + str(preds[1]))

# Output shape, parameter 개수 등 summary 정보
happyModel.summary()

# 흐름도 그리기
plot_model(happyModel, to_file='HappyModel.png')
SVG(model_to_dot(happyModel).create(prog='dot', format='svg'))
2. ResNet을 하는 이유 : Gradient Vanishing & Exploding
Vanishing gradient problem이란 무엇인가?
2015년 12월 Quora 글 https://www.quora.com/What-is-the-vanishing-gradient-problem 의 번역 글쓴이 Nikhil Garg - Quora 엔지니어링 매니저 Vanishing Gradient Problem(기울기값이 사라지는 문제)는 인공신경..
ydseo.tistory.com
Gradient Vanishing 개념에 혼동이 와 다시 찾아보았다. parameter W의 Gradient 가 0에 수렴하는 현상으로, 해당 현상이 발생하면 gradient가 너무 작아 update 속도가 현저히 느려진다. 해당 현상은 초기 layer의 weight에서 더 잘 나타난다. 이유는 다음과 같다.
sigmoid함수를 사용하는 경우, input 값의 범위가 어떻든간에 output은 0~1 의 범위에 들어가고 layer가 깊어질 수록 그 범위는 더더욱 좁아질 것이다(예를 들어 0.45~0.55). 이렇게 되면 초기 layer의 w 값들을 큰 폭으로 변경해도 마지막 output 값에서의 차이는 크지 않을 것이며 따라서 cost 함수에 대한 미분값(gradient)는 매우 작을 것이다( gradient의 정의를 되새겨보자).
그래서 Relu 함수를 사용하는 것인데, 왜 resnet까지 써야할까...?
=> 결국 gradient vanishing, exploding 문제를 해소하는 방법론 중 하나. 그 방법론에는 Relu, 가중치초기화(Xavier 등), Batch Normalization 등이 있지
3. ResNet 에서 skip 하는 layer는 필요에 따라 3개를 사용하기도 한다.
4. glorot_uniform 은 xavier initializing 을 위한 parameter이다.
X = Conv2D(filters = F1, kernel_size = (1, 1), strides = (1,1), padding = 'valid', name = conv_name_base + '2a', kernel_initializer = glorot_uniform(seed=0))(X)
5. Batch Normalization
1) 코드
# GRADED FUNCTION: identity_block

def identity_block(X, f, filters, stage, block):
    """
    Implementation of the identity block as defined in Figure 4

    Arguments:
    X -- input tensor of shape (m, n_H_prev, n_W_prev, n_C_prev)
    f -- integer, specifying the shape of the middle CONV's window for the main path
    filters -- python list of integers, defining the number of filters in the CONV layers of the main path
    stage -- integer, used to name the layers, depending on their position in the network
    block -- string/character, used to name the layers, depending on their position in the network

    Returns:
    X -- output of the identity block, tensor of shape (n_H, n_W, n_C)
    """

    # defining name basis
    conv_name_base = 'res' + str(stage) + block + '_branch'
    bn_name_base = 'bn' + str(stage) + block + '_branch'

    # Retrieve Filters
    F1, F2, F3 = filters

    # Save the input value. You'll need this later to add back to the main path.
    X_shortcut = X

    # First component of main path
    X = Conv2D(filters = F1, kernel_size = (1, 1), strides = (1,1), padding = 'valid', name = conv_name_base + '2a', kernel_initializer = glorot_uniform(seed=0))(X)
    X = BatchNormalization(axis = 3, name = bn_name_base + '2a')(X)
    X = Activation('relu')(X)

    ### START CODE HERE ###

    # Second component of main path (≈3 lines)
    X = Conv2D(filters = F2, kernel_size = (f,f), strides = (1,1), padding = 'same', name = conv_name_base + '2b', kernel_initializer = glorot_uniform(seed=0))(X)
    X = BatchNormalization(axis = 3, name = bn_name_base + '2b')(X)
    X = Activation('relu')(X)

    # Third component of main path (≈2 lines)
    X = Conv2D(filters = F3, kernel_size = (1,1), strides = (1,1), padding = 'valid', name = conv_name_base + '2c', kernel_initializer = glorot_uniform(seed=0))(X)
    X = BatchNormalization(axis = 3, name = bn_name_base + '2c')(X)

    # Final step: Add shortcut value to main path, and pass it through a RELU activation (≈2 lines)
    X = Add()([X , X_shortcut])
    X = Activation('relu')(X)

    ### END CODE HERE ###

    return X
참고로 마지막에 X와 X_shortcut을 더해야하므로 두개의 차원을 맞춰주기 위해서 second component 에서 'same' 을 사용한다.
2) axis
BN할 때, axis의 의미를 잘 모르겠다. 아는 분 댓글좀 부탁드려요 ㅜ
05-2. 심층 신경망 학습 - 배치 정규화, 그래디언트 클리핑
05-2. 심층 신경망 학습 - 배치 정규화, 그래디언트 클리핑 저번 포스팅 05-1. 심층 신경망 학습에서는 DNN 학습에 있어서 적절한 활성화 함수 및 가중치 초기화 방법에 대해 알아보았다. 이번 포스
excelsior-cjh.tistory.com
아주 좋은 글이다. 앞서 다른 글에서 Batch Normalization 에 대해 기술했던 내용과 동일해서 안심된다 ㅎ..
보통 Conv(or FC) -> BN -> Activation 순서로 적용한다.
6. Building ResNet 이해
1) 코드
# GRADED FUNCTION: ResNet50

def ResNet50(input_shape = (64, 64, 3), classes = 6):
    """
    Implementation of the popular ResNet50 the following architecture:
    CONV2D -> BATCHNORM -> RELU -> MAXPOOL -> CONVBLOCK -> IDBLOCK*2 -> CONVBLOCK -> IDBLOCK*3
    -> CONVBLOCK -> IDBLOCK*5 -> CONVBLOCK -> IDBLOCK*2 -> AVGPOOL -> TOPLAYER

    Arguments:
    input_shape -- shape of the images of the dataset
    classes -- integer, number of classes

    Returns:
    model -- a Model() instance in Keras
    """

    # Define the input as a tensor with shape input_shape
    X_input = Input(input_shape)


    # Zero-Padding
    X = ZeroPadding2D((3, 3))(X_input)

    # Stage 1
    X = Conv2D(64, (7, 7), strides = (2, 2), name = 'conv1', kernel_initializer = glorot_uniform(seed=0))(X)
    X = BatchNormalization(axis = 3, name = 'bn_conv1')(X)
    X = Activation('relu')(X)
    X = MaxPooling2D((3, 3), strides=(2, 2))(X)

    # Stage 2
    X = convolutional_block(X, f = 3, filters = [64, 64, 256], stage = 2, block='a', s = 1)
    X = identity_block(X, 3, [64, 64, 256], stage=2, block='b')
    X = identity_block(X, 3, [64, 64, 256], stage=2, block='c')

    ### START CODE HERE ###

    # Stage 3 (≈4 lines)
    X = convolutional_block(X, f=3, filters = [128, 128, 256], stage = 3, block='a', s = 2)
    X = identity_block(X, 3, [128, 128, 256], stage=3, block='b')
    X = identity_block(X, 3, [128, 128, 256], stage=3, block='c')
    X = identity_block(X, 3, [128, 128, 256], stage=3, block='d')

    # Stage 4 (≈6 lines)
    X = convolutional_block(X, f=3, filters = [256, 256, 1024], stage = 4, block='a', s = 2)
    X = identity_block(X, 3, [256, 256, 1024], stage=4, block='b')
    X = identity_block(X, 3, [256, 256, 1024], stage=4, block='c')
    X = identity_block(X, 3, [256, 256, 1024], stage=4, block='d')
    X = identity_block(X, 3, [256, 256, 1024], stage=4, block='e')
    X = identity_block(X, 3, [256, 256, 1024], stage=4, block='f')

    # Stage 5 (≈3 lines)
    X = convolutional_block(X, f=3, filters = [512, 512, 2048], stage = 5, block='a', s = 2)
    X = identity_block(X, 3, [512, 512, 2048], stage=5, block='b')
    X = identity_block(X, 3, [512, 512, 2048], stage=5, block='c')

    # AVGPOOL (≈1 line). Use "X = AveragePooling2D(...)(X)"
    X = AveragePooling2D(pool_size = (2,2),name = 'avg_pool' )(X)
    '''The 2D Average Pooling uses a window of shape (2,2) and its name is "avg_pool".
The 'flatten' layer doesn't have any hyperparameters or name.
The Fully Connected (Dense) layer reduces its input to the number of classes using a softmax activation. Its name should be 'fc' + str(classes).
    '''
    ### END CODE HERE ###

    # output layer
    X = Flatten()(X)
    X = Dense(classes, activation='softmax', name='fc' + str(classes), kernel_initializer = glorot_uniform(seed=0))(X)


    # Create model
    model = Model(inputs = X_input, outputs = X, name='ResNet50')

    return model
2) Input() 이 뭐고 ?
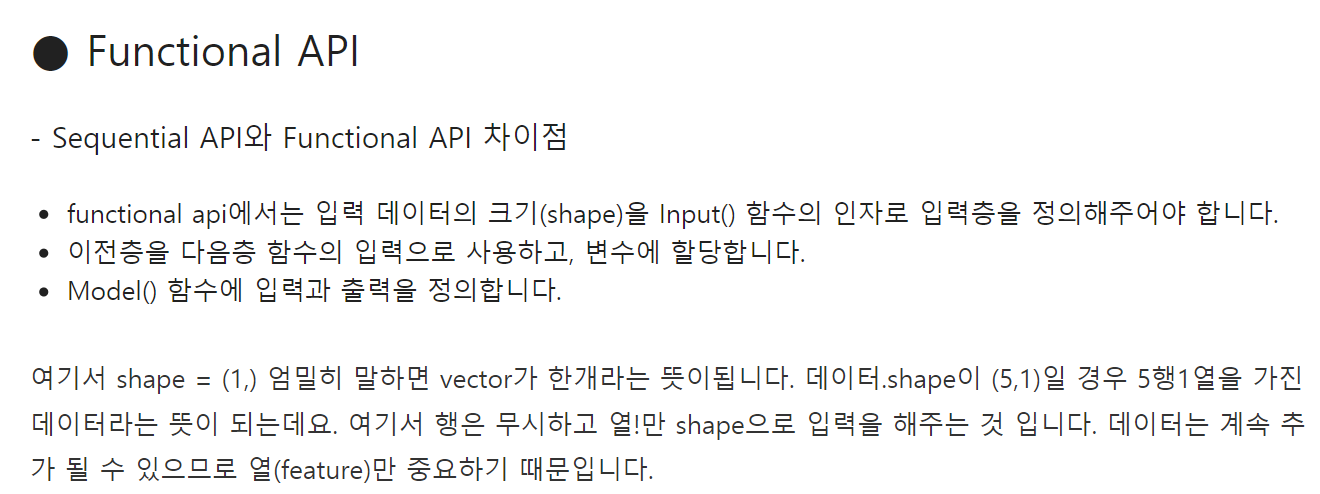
즉, Input(shape)을 통해 입력층을 정의하는 것.
비판과 질문은 언제나 환영입니다. 많이 꾸짖어주세요.
'DeepLearning Specialization(Andrew Ng) > Convolutional Neural Networks' 카테고리의 다른 글
| [Week 3] Quiz & Programming Assignments (0) | 2020.11.13 |
|---|---|
| [Week 3] 1. Detection Algorithm (0) | 2020.11.12 |
| [Week 2] 2. Practical Advices for Using ConvNet (0) | 2020.11.08 |
| [Week 2] 1. Case studies (0) | 2020.11.06 |
| [Week 1] Programming Assignments (0) | 2020.11.03 |


